Robotics 2: 315P (High Stakes)
・2396 words
🚨THIS IS A TECHNICAL POST🚨
This is the second part of what will soon become a four- or five-part series. The first two parts are about my time on the robotics team 315P.
Here are the previous posts:
Preface: For much of the Over Under and High Stakes seasons of the VEX V5 Robotics Competition, I served as the lead coder for the middle school team 315P. This post is a collection of my thoughts about working on it :)
Season 2: High Stakes
Luckily for whoever is still reading this, there are no more cringe blog posts for you read 🥳
After we had finished celebrating our awards, we began working on our robot for the next season, High Stakes. I won’t bother going through the game or the evolution of our robot again, but for reference, here is a description of the game. I’m not going to write a sonnet about my time on the team again, but I’d instead like to dive a little more into some technical details in this section. I’ll go in order from the bare metal to the code I wrote.
Kernel
Any and all code I write for the robot runs on the VEX V5 brain:
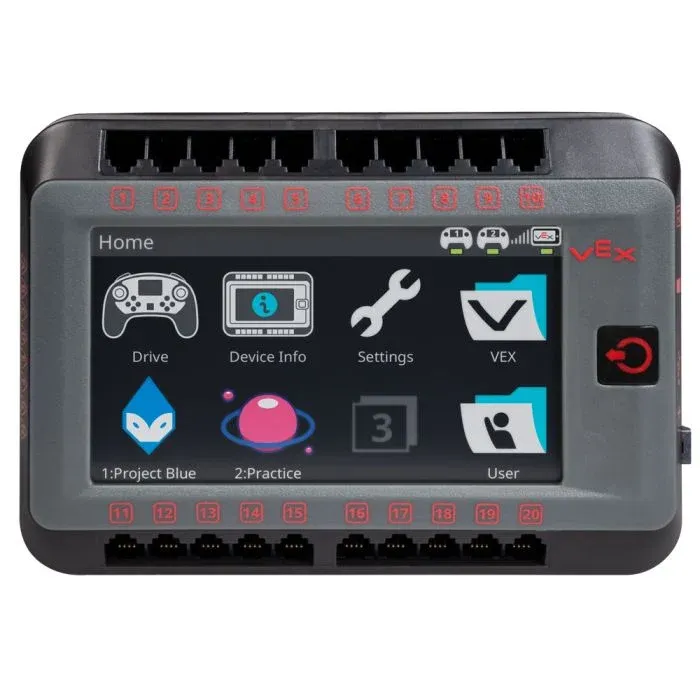 This runs VEXos, which is not a full-fledged operating system, per se, but enables the execution of custom binaries which can interface with I/O. I/O on the V5 brain includes quite a few things, most of which come from either the screen, the smart ports (pictured above on either vertical side of the screen), or the three-wire ports (not shown above).
- Inputs
- Touch events on the brain screen
- Sensing inputs from any smart ports (including motor readings)
- Sensing inputs from any three-wire ports
- Battery levels
- Reading files from the SD slot
- Serial over the USB port
- Outputs
- Displaying things on the brain screen
- Actuators (mostly motors)
- Pneumatics over three-wire ports
- Writing files onto the SD slot
- Serial over the USB port
Typically, these binaries are built and uploaded through VEX’s proprietary IDE, VEXcode, or its corresponding VScode extension. However, there is also a division of VRC called VEXU, which is a collegiate-level version of the competition with more coding, two robots per team, and a few other different things. It turns out that Purdue University has a VEXU team, BLRS the Purdue ACM SIGBots (one of my all-time favorite teams :D), and clearly college students have too much time because they wrote their own operating system for the V5…
PROS
PROS (either Purdue Robotics Operating System, or the infamously recursive PROS Robotics Operating System) is a custom RTOS built on top of the V5’s VEXos kernel by the Purdue Sigbots team. It looks something like this:
- You write C++ code that calls PROS APIs
- PROS uses a custom build tool to build it into a binary that accesses the correct I/O on the V5
- You upload the binary (or a differential patch to the binary) to the V5, which then runs it using its kernel
- Voila! Your robot does things
“Wait but this is just what VEXcode does 🤓”… yes, that is true. However, PROS is chosen by the top teams for a number of reasons:
- Documentation. PROS has actually well-documented APIs compared to the mess of VEX APIs. For example, VEX only somewhat documented their APIs a few months ago — even though they’ve existed for years!
- External libraries. VEXcode’s tough integration with other tools makes it hard to have a proper package management system. In contrast, PROS has a robust library ecosystem with hundreds if not more packages ready to install via their CLI (another thing that VEXcode doesn’t have).
- IDE integration. While PROS has a recommended VSCode plugin, its extensible CLI means you can code in it from everywhere (including Zed, my favorite code editor). VEXcode can only be used from their proprietary app or VSCode extension. Also, VEXcode has very weird code structure, while PROS’ is just regular C++ with cpp and header files.
- PROS is open-source! All of VEXCode’s APIs and protocols are closed-source (although the SIGbots team got access to it under a NDA to develop PROS) while every single bit of PROS is open-source and on Github. This has enabled the community to do a bunch of cool things. The coolest of these, in my opinion, is vexide, which is a runtime like PROS for the V5, with two major differences. 1) It supports async. But wait, C++ doesn’t have async. And then we have 2) It’s written in Rust!
This is hopefully enough to convice anyone to switch to PROS! Time to go one abstraction level higher.
VOSS
VOSS is a PROS library which includes utilities for robots. It contains quite a few utilities:
- Motion, including custom path planning, PID, motion controllers, etc.
- An autonomous routine selector (wait a little bit more to learn what that means!)
- Odometry. This is basically some math that takes in sensor readings (namely, from inertial movement units and unpowered tracking wheels) and does trigonometry to determine the robot’s position and orientation.
Each of these things on its own isn’t super hard, but VOSS packages them all neatly into one, well, package. There are other libraries in this space, like LemLib, but I chose VOSS for our codebase because 1) it supported the newest PROS version (4.0), 2) it was written by Purdue SIGbots, who also maintained PROS, and 3) it had an intuitive and well-structured API that put my code to shame. VOSS is truly magic; it replaces about two hundred lines of odometry code, followed by dozens of lines of path planning math, followed by another hundred lines of PID controls, with this:
chassis.move({1.0, 1.0, 30}, 100, voss::Flags::RELATIVE);It’s honestly insane how much thought the SIGbots team put into this, so please give them a ⭐ on Github :)
My code
All of the above work is either of VEX or the SIGbots, so it’s finally time to dive into my code! All of the code I’m talking about is from this repo. My code is honestly very simple, less than 500 lines, so this overview ought to be pretty short.
Level 1: Wrappers
VOSS provides an excellent API surface to build off of, but at the time of writing the initial codebase, the team was considering adding another coder, and to simplify their onboarding, I decided to write yet another wrapper over VOSS which abstracts even more away. Namely, it handles the motor setup, odometry parameters, etc., and limits the number of functions that could be called (as a means of enforcing that other coders wrote appropriate code). Here is a basic header containing basically the entire wrapper API:
// before this, there are about 50-100 `#define`s which store the config parameters for all of our code.
// all `#include` or `use` calls are omitted
// [a number of internal functions]

namespace robot {
    void rumble(const char* sequence);
    void log(std::string message, std::string end = "\n");
    void log_pose(std::string end = "\n");
    enum class Direction;
    extern pros::Controller controller;
}

namespace robot::selector {
    void init(std::map<std::string, void(*)()> game_autons, VoidFn skills_auton, int default_auton, bool show_graphics = true);
    void run_auton();
}

namespace robot::auton {
    void start(voss::Pose starting_pose);
    void checkpoint(std::optional<std::string> point = std::nullopt);
    void end();
}

namespace robot::drive {
    extern bool mirrored; // false = red
    void init();
    void face(double angle, double speed = 100);
    void go(double distance, float speed = 100);
    void swing(double angle, bool reversed = false);
    void set_mirroring(bool state);
    void set_position(voss::Pose position);
}

namespace robot::subsys {
    void init();
    extern Direction intake_state;
    void intake(Direction direction, float speed = 1);
    void wsm(Direction direction, float speed = 1);
}
This is quite the shortening from the ~100 public functions that could be called from VOSS. If I wanted to execute a particularly customized motion in a routine, however, I would directly call a VOSS function. A briefly explanation of what each namespace contains:
robot— the root namespace- A number of logging functions (including
rumble, which vibrates the controller according to a specific pattern) selector— the autonomous selector- Initialize the selector with a
mapmatching various routine names to their corresponding functions run_autonwhich ran the selected routine
- Initialize the selector with a
drive— the chassis codeset_mirroring— sets the mirroring of the drivetrain, this will be explained more later- The others are fairly self-explanatory, just a collection of simple functions to move the robot around
subsys— code for controlling other systems on the robot * Functions for changing the state of other subsystems
- A number of logging functions (including
Now that this is all out of the way, let’s explain a bit more about the autonomous selector.
Level 2: The autonomous selector and autonomous routines
As noted in the first blog post, V5RC matches start with a 15-second autonomous period. This is where the code I write gets executed (there are only ~50 LOC dedicated to running in the driver control period). Strategy in High Stakes is very important; for example, if teams do not coordinate their autonomous strategies, both robots could try to score on their alliance stake at the same time and clash, preventing either one from scoring and messing up the rest of the autonomous routines. Thus, a number of different routines, colloquially known as “autons”, are needed. There is, of course, also a need to choose two things at the beginning of a match: which auton to run, and what side the robot is on (blue or red). The latter is important because in High Stakes, the field is symmetric by reflection (while the Over Under field was symmetric by rotation), creating the need to “mirror” the turns of an autonomous routine if it switches sides. This was handled by our selector, which ended up looking like this:
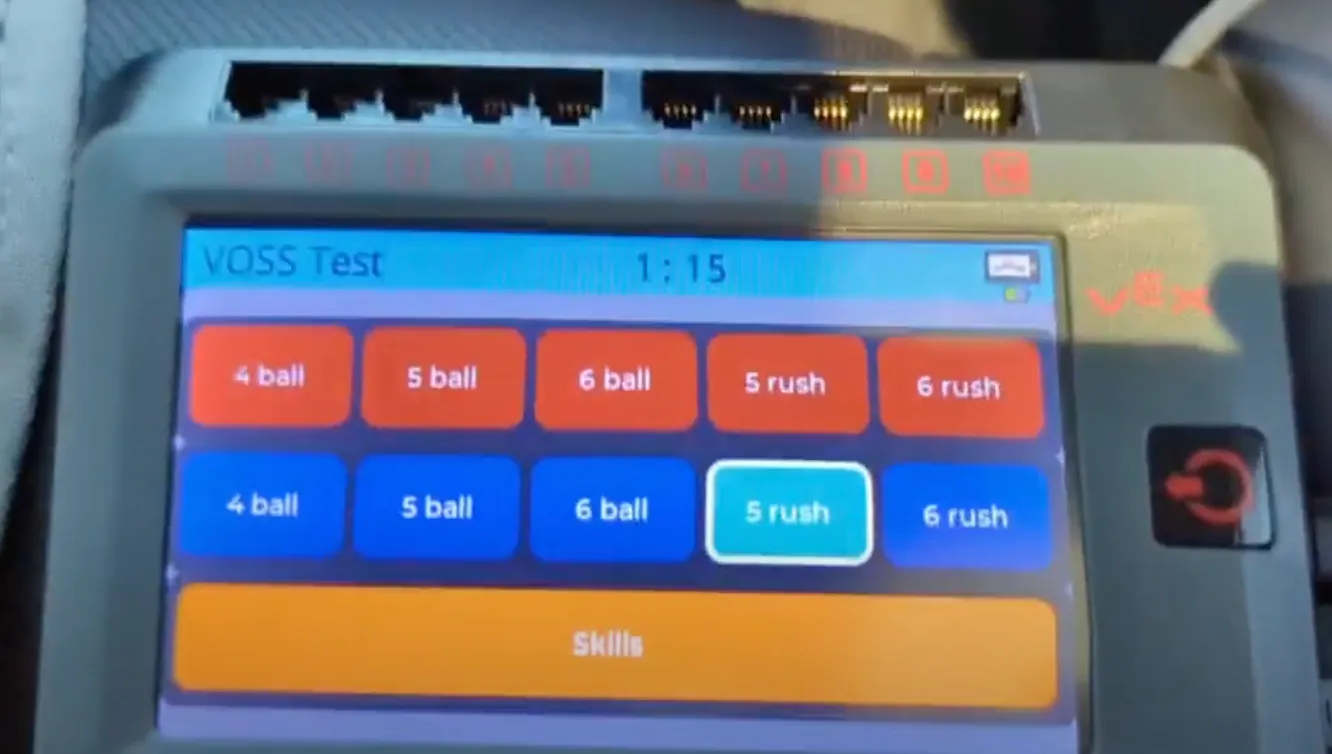 (ignore the thing at the bottom that says “Skills”.)
When the field control told the robot to run its autonomous, whichever routine had last been clicked on was run. The code for autons themselves look something like this:
// code/src/autons.cpp
#include "pros/rtos.hpp"
#include "robot/basics.hpp"
#include "robot/robot.hpp"

using namespace robot;
using namespace robot::drive;
using namespace robot::subsys;
using namespace voss;
// ...
namespace autons::shared {
    /**
     * @brief An auton whose only goal is to gain the Autonomous Win Point (AWP).
     *
     * @note This auton was designed with intake raise and odom.
     *
     * @details
     * Starting position: NR starting position
     * 1. Aligns with alliance wall stake & scores preload
     * 2. Gets mogo
     * 3. Get NR square rings
     * 4. Touch ladder
    //  */
    void awp() {
        auton::start({0,0,180}); // UTB mirrored ? 0 : 180 ; please test auto mirroring
        /**
         * Align with alliance wall stake & score preload
         */
        go(-16);
        face(90);
        go(-9);
        go(-2);
        go(1.75);
        intake(Direction::FORWARD);
        pros::delay(550);
        /**
         * Get mogo
         */
        go(10);
        face(-49);
        mogo.extend();
        go(-27);
        intake(Direction::STOP);
        go(-10, 30);
        mogo.retract();
        pros::delay(800);

        auton::checkpoint("Got mogo");
        /**
         * Get NR square ring
         */
        face(139);
        intake(Direction::FORWARD);
        go(17.5);
        pros::delay(400);
        /**
         * Get ring from stack next to square
         */
        swing(-32, true);
        go(20);
        pros::delay(400);

        auton::checkpoint("Got da goods");
        /**
         * Touch ladder
         */
        go(-25);
        go(-5, 60);

        auton::checkpoint("Touched ladder");
        auton::end();
    }}
// ...
That’s basically all I have to say about the robot’s codebase. Hope some of these details were helpful!
Epilogue
Due to internal frustrations with how the team was being managed and the lack of focus on coding, I left the team in October 2024. As for the future of the team, they recently qualified to the World Championships by getting a design award at states. Unfortunately, their coding is in limbo at the moment as multiple other coders have left the team or are busy with other extracurriculars. As noted above, to preserve my original code (entirely written by me, with no external authors), I have cloned the repository at the time of my leaving the team in this MIT-licensed repo. Hope this post was helpful/inspiring/something!
